Both Silverlight and WPF use XAML markup to describe their user interface. As I’m currently writing my chapter on WPF for my book IronRuby In Action and I want to use some xaml that has been generated before for a different project but with an IronRuby class to load the xaml I’m in trouble. This is because you can declare assembly references in the xml namespace declarations so you can use the types in that assembly from xaml.
The DLR based languages don’t compile into static assemblies and this means that you can’t use those xml namespace definitons to reference your assemblies. I wrote a fairly trivial control that acts like a hook for DLR based controls in the XAML tree.
The idea behind this control is that you can “hook” your DLR based control into the visual tree by setting some properties. You can set properties on the DLR based control by setting the Attributes property on the DynamicScriptControl
Let’s look at a quick example:
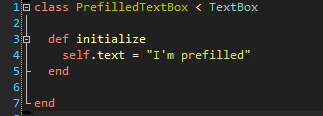
The ruby file defining a custom TextBox. But you can do whatever you want in that ruby file of course.
All this textbox does is preset it’s text property to “I’m prefilled”
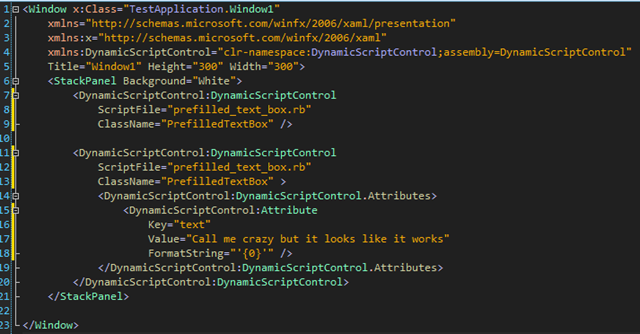
The xaml for the window
You first declare a namespace for the assembly that has the DynamicScriptControl. Next I have a StackPanel that contains 2 DynamicScriptControls. The first just contains the 2 mandatory properties. We need to know which class you want to instantiate in the file you provide by setting the ScriptFile property. This script file property is a path to your ruby file in my case prefilled_text_box.rb.
The second DynamicScriptControl is one where I want to initialize the control with my own text property. To declare those properties you have to add them to the Attributes collection of the DynamicScriptControl. At this moment it’s not smart enough to know which datatype you give it so you can specify a format string which was necessary in this case because text is a string.
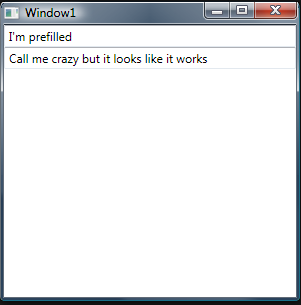
The result
Michael Foord the author of IronPython In Action will provide the python integration in this control.
There was a release of the Dynamic Silverlight SDK earlier this week which contained the necessary source code files to compile a common DLR for both IronRuby and IronPython. That is what makes it possible to support multiple scripting languages from the start.
I’ve hosted the source code on google and you can find that at:
It’s been a bit of journey but my IronRuby in Action book finally went into EAP today. EAP means exactly what it means in the software world, still very much subject to change. This could be seen as a public review :) I welcome any suggestions you may have.
You can find the book at http://manning.com/carrero
There is also a forum there where you can post suggestions and/or problems you may encounter when running the code samples. I look at it as my issue tracker :)
I’m currently working on a chapter where I build a complete twitter client with IronRuby and WPF (not silverlight as indicated on the current TOC). It is based on Witty but uses IronRuby instead of C# to drive the xaml. Also some storyboards have been replaced by IronRuby instead of by xaml stuff. It’s also not a straight port of Witty because I haven’t really looked at their code apart from the xaml that is.
Happy reading :)
Update: Some people started calling it the “jugs book”
I’ve set out to build my first “real” application (still playground material) with IronRuby today and for me no application can be built without having the unit tests or specs to give me that warm fuzzy feeling that things should work. That being said the first thing on my list of things to do is figure out how to use the minispec framework that IronRuby currently uses to write my specs.
Since my application will be doing a fair bit of http requests I want to be able to mock that out so I don’t have to rely on the webservers to be up and running or being online to run the specs.
The first thing I did was copy a couple of files from the tests\IronRuby\Specs directory in the directory where you downloaded the IronRuby source code into C:\tools\IronRuby in my case. I copied those files in a specs subdirectory of my application directory. The files we’re going to need are:
mini_mock.rb
mini_rspec.rb
mspec_helper.rb
rspec_helper.rb
simple_mock.rb
spec_helper.rb
spec_runner.rb
The next thing on my to-do list is then to change some of the files so that we can run our own specs on our terms.
The first changes I made are in spec_helper.rb. I replace require ‘mini_mock’ on line 18 with require File.dirname(__FILE__) + '/mini_mock'
The next bit is in the spec_runner.rb file. I just removed the word core/ in that file because our specs will just live in a directory structure under the specs folder.
Now to create the first spec and mock with that spec framework:
I created a folder models in my specs folder. In that folder I created a file spec_test_spec.rb with the following content
This just has a test method to see if it will run the rspec syntax and the second is where I tested to see if I could mock methods on objects. In the future we’ll be able to use mocha and rspec for example and then we’ll have a nicer syntax for mocking stuff. But this will do for now.
Then I opened up a command console and navigated to the folder that contains my application
+ C:\projects\lumpr\src\Sylvester.DesktopEdition\Sylvester.IronRuby\specs

» **ir spec_runner.rb models - pass**

Specs should work
Specs should mock methods
Total pass: 2 out of 2 examples
I may post an example later this week with some real tests but this shows you how to get going with the mini spec framework to test your .NET stuff today.
When I started looking at Ninject I was pretty impressed by how nice the code looks and how well the project has been put together. Nate had been profiling the project yesterday and it performs slightly better than its cousin from the Castle framework but that difference is almost negligible.
However I recommend you download the Ninject framework and just look at its codebase because it may teach you some new tricks or give you some new insights. The rest of this post will explain a small MVP framework for Ninject and WPF that I added to Ninject contrib last weekend.
When I downloaded the Ninject code for the first time I immediately saw that it had integration points for Monorail, ASP.NET and Winforms but sadly I was looking at it for a WPF application. For doing the type of MVP I wanted to do with WPF I couldn’t straight copy what was there for Winforms and neither what was there for Webforms. It looked like it walked some middle ground. So I looked very closely at what Nate had done before me and learned.
Apart from the occasional IronRuby demo I had never used WPF with the intent of building a moderately sized system on top of it. I did have a couple of design guidelines that helped me through my voyage but most of my what I applied comes from Jeremy Miller’s blog in his excellent build your own CAB series. I looked at 1 post in particular the third one about the Supervising controller.
I figured out that I didn’t want to make my view now anything or as little as possible about my presenter or at least as little as possible. The way I have it now allows one view per presenter; they are mapped one-to-one. In the repository of the contrib project there is the framework and a little sample application. A log viewer that uses the framework to demonstrate its usage.
I was going to tell you about Modules etc. but all that stuff is nicely explained in the ninject wiki so I don’t really feel the need to write it all up again. I will however explain you how to get started with the MVP framework that now comes with Ninject.
We need to tell our application that we want to use Ninject and to do that there are 2 ways:
Inherit of Ninject.Framework.PresentationFoundation.NinjectWpfApplication which also makes you change the XAML of the application. I didn’t really like that so I came up with a second way.
Initialize the application through the KernelContainer static helper class.
[LogMyCalls]publicpartialclassApp{protectedoverridevoidOnStartup(StartupEventArgse){// KernelContainer.InitializeApplicationWith(this, new LinFuModule(), new NLogModule(), new WpfModule(), new LoggingModule());this.InitializeApplicationWith(newLinFuModule(),newNLogModule(),newWpfModule(),newLoggingModule());base.OnStartup(e);}}
This tells our application that we are going to use Ninject in this application. And should initialize all the services we will need in our application.
Next on the list is the View. There is probably a better way to do this (read I’m not entirely happy with this but have a rather small brain). We need to tell the view which presenter we will be using, for that I added a PresentedBy attribute that takes a type (the presenter type). And you also have to override the OnInitialized event and again use the KernelContainer helper class to initialize the presenter. There is a reason for this, at a certain point during my testing I had it so that the view was agnostic of the controller but that meant I would have to skip a couple of checks before running the window. I may add that later again not sure. The views aren’t decorated with the service attribute so they won’t get picked up by the AutoModule instead we inject it manually through its initialisation procedure.
So far we’ve got a view that knows how to initialize a presenter but it also needs to be able to communicate with the presenter. I chose to expose the relevant items I will need in my presenter through properties on the view and I chose to use a Publish/Subscribe model through a customized Ninject MessageBroker to handle my events. This allowed me to not couple my view too tightly to the presenter. You can customize the name of the published action but not the publisher at this moment. And that’s what the PublishAction is for. It uses a standard event handler but will ignore the arguments that you would send to it. The presenter should go back to the view to interrogate it about its state.
And the last piece we need to talk about is the Presenter. The Ninject presentation foundation project holds a Generic PresenterBase class that takes the interface/type of the view as a type parameter. I let Ninject auto-register my components so I just decorated the presenter class with [Service] and it will get picked up by the Ninject Kernel. You can subscribe to an action from the view by using a [SubscribeToAction] attribute. That attribute takes the class name of the view as a parameter as well as the name of the action you want to subscribe to.
And that should be all you need to know to get started. It’s not a hell of a lot of code in the presentation framework and the sample application contains NSpecify specs in combination with Moq for mocking.
Yesterday we had a little introduction to Ninject. Today I’d like to examine what’s involved in getting some AOP style logging going for your application. I find that there are only very few places where I’m logging something that steps out of the bounds of being called at the end of the method when things succeed. I’m generally more interested in what happens when things go wrong and that’s when I log the exception. In some cases I’ll be interested in the actual parameters.
The code I’m going to show you will take care of basic logging needs but if you want more information about what happens inside your method you’re either going to need to extend my implementation or log the call from within your method body. We’re going to implement logging that when run with the debug level turned on will tell us that a method is going to execute, whether it finished successfully or with an error and if there was an error it will also log the exception.
To get this thing on the road, on the LightSpeed road that is. We’re going to use NLog to get flexible routing of log messages. We’re first going to create a LightSpeedTarget that is a customized NLog target (route destination) for your log messages.
namespaceLoggingDemo.UI.Integration{/// <summary>/// This class represents a NLog target that we can reference in the NLog.config file/// You can use this to use Lightspeed to log to the database just like a file target etc./// </summary> [Target("LightSpeedTarget")]publicclassLightSpeedTarget:TargetWithLayout{publicLightSpeedTarget(){Layout="${message}";}protectedoverridevoidWrite(LogEventInfologEvent){varlogMessage=CompiledLayout.GetFormattedMessage(logEvent);varappEvent=newApplicationEvent{Sequence=logEvent.SequenceID,EventTime=logEvent.TimeStamp,Level=logEvent.Level.Name,LoggerName=logEvent.LoggerName,Message=logMessage};if(logEvent.Exception!=null)appEvent.Exception=logEvent.Exception.ToString();if(logEvent.StackTrace!=null)appEvent.StackTrace=logEvent.StackTrace.ToString();if(logEvent.UserStackFrame!=null)appEvent.UserStackFrame=logEvent.UserStackFrame.ToString();Repository.Add(appEvent);Repository.CompleteUnitOfWork();}}}
The class above overrides the TargetWithLayout class from the NLog project. The attribute tells NLog how to find this target. In the constructor I override the default message layout because it was a bit too verbose to my liking.
We then override the Write method where we map the properties to our ApplicationEvent. And lastly we add the event to the repository and commit it.
Now if we want our application to use this we’re going to have to tell it how. Nlog does this by looking for an nlog.config file in your application directory. So let’s go ahead and add an nlog.config file to our project. I’ll show you the nlog.config file for the application. In my unit test project I’m using the console logger so I can see what’s going on :)
The NLog.config file for the application:
My NLog.config file for my test project:
This enables our application to use the target we just created. Moving on now to the Interceptor which is Ninject specific (You can do the same with other DI frameworks). In Ninject you can tell the kernel to intercept a method on a class and execute some logic before and after invocation of the method. We can tell Ninject to intercept all methods on a class, specific methods or when we say all methods we can still exclude some of them. For our logging example I chose to use all methods on a class. You can do this by decorating the class with an [Intercept] attribute. If you would want a method not to be intercepted you can by decorating that method with an [DoNotIntercept] attribute.
I took the liberty of inheriting of that attribute first.. that makes the rest of my code look a little bit prettier.
usingSystem;usingNinject.Core.Interception;usingNinject.Core.Logging;namespaceLoggingDemo.UI.Interceptors{publicclassLoggingInterceptor:SimpleFailureInterceptor{privatereadonlyILogger_logger;privatebool_hasError;publicLoggingInterceptor(ILoggerlogger){_logger=logger;_hasError=false;}protectedoverridevoidBeforeInvoke(IInvocationinvocation){_logger.Debug("About to invoke {0}",MethodNameFor(invocation));}protectedoverridevoidOnError(IInvocationinvocation,Exceptionexception){_logger.Error(exception,"There was an error invoking {0}.\r\n",MethodNameFor(invocation));_hasError=true;base.OnError(invocation,exception);}protectedoverridevoidAfterInvoke(IInvocationinvocation){_logger.Debug("invocation of {0} finished {1}.",MethodNameFor(invocation),(_hasError?"with an error state":"successfully"));}privatestaticstringMethodNameFor(IInvocationinvocation){returninvocation.Request.Method.Name;}}}
This class only overrides a couple of callbacks from its base class the SimpleFailureInterceptor. This is where the actual interception takes place.
This is al the work that is involved in the actual implementation of our logger. Now I’d like to get some confirmation that things actually do work. Unit testing to the rescue I’d say ;)
The first thing we’re going to need is way to verify that stuff actually got intercepted. I did that by subclassing the LoggingInterceptor with a LoggingCounterInterceptor in my unit test project.
publicclassLoggingCounterInterceptor:LoggingInterceptor{publicintCount{get;privateset;}publicintErrorCount{get;privateset;}publicvoidReset(){Count=ErrorCount=0;}publicLoggingCounterInterceptor(ILoggerlogger):base(logger){}protectedoverridevoidBeforeInvoke(Ninject.Core.Interception.IInvocationinvocation){Count++;base.BeforeInvoke(invocation);}protectedoverridevoidOnError(Ninject.Core.Interception.IInvocationinvocation,System.Exceptionexception){ErrorCount++;base.OnError(invocation,exception);}}//The attribute for testingpublicclassLogMyCallsCounterAttribute:InterceptAttribute{publicLogMyCallsCounterAttribute():base(typeof(LoggingCounterInterceptor)){}}
In the code above we’re just adding 2 counter properties to the interceptor and adding their counts at the appropriate time. Next we’re going to need some kind of service class or something on which we can use our interceptor, enter the InterceptedServiceMock.
publicinterfaceIInterceptedServiceMock{voidMethodWithoutBody();voidMethodThatThrowsAnException();}[LogMyCallsCounter]publicclassInterceptedServiceMock:IInterceptedServiceMock{publicvirtualvoidMethodWithoutBody(){// Nothing to do here}publicvirtualvoidMethodThatThrowsAnException(){thrownewException("Because I can.");}}
The code above has one method that should execute and one method that throws an exception so we can verify things get picked up accordingly. Now all that’s left to do is write the appropriate specs for them and see if they pass :)
[Context(Description = "Specifies the behavior for the LogMyCallsInterceptor")]publicclassLogMyCallsInterceptorSpec{privateIKernel_kernel; [BeforeEach]publicvoidBefore(){varinlineModule=newInlineModule(m=>m.Bind<IInterceptedServiceMock>().To<InterceptedServiceMock>());_kernel=newStandardKernel(newLinFuModule(),newNLogModule(),inlineModule);} [AfterEach]publicvoidAfter(){_kernel.Dispose();} [Specification("All this should do is show the calls in the test runner. It should log to the console")]publicvoidShouldShowCallsInConsole(){varservice=_kernel.Get<IInterceptedServiceMock>();IContextcontext=newStandardContext(_kernel,typeof(IInterceptedServiceMock));IRequestrequest=newStandardRequest(context,service,typeof(InterceptedServiceMock).GetMethod("MethodWithoutBody"),newobject[0]);varinterceptors=_kernel.GetComponent<IInterceptorRegistry>().GetInterceptors(request);varenumerator=interceptors.GetEnumerator();enumerator.MoveNext();Specify.That(interceptors.Count).Must.Equal(1,"There should be 1 interceptor registered");Specify.That(enumerator.Current).Must.Be.InstanceOf(typeof(LoggingCounterInterceptor));varinterceptor=enumerator.CurrentasLoggingCounterInterceptor;service.MethodWithoutBody();Specify.That(interceptor).Must.Not.Be.Null();Specify.That(interceptor.Count).Must.Equal(1,"There should be 1 invocation counted.");} [Specification("Should show valid counts for a number of invocations")]publicvoidShould_Show_Correct_Counts_For_Number_Of_Invocations(){varservice=_kernel.Get<IInterceptedServiceMock>();IContextcontext=newStandardContext(_kernel,typeof(IInterceptedServiceMock));IRequestrequest=newStandardRequest(context,service,typeof(InterceptedServiceMock).GetMethod("MethodWithoutBody"),newobject[0]);varinterceptors=_kernel.GetComponent<IInterceptorRegistry>().GetInterceptors(request);varenumerator=interceptors.GetEnumerator();enumerator.MoveNext();Specify.That(interceptors.Count).Must.Equal(1,"There should be 1 interceptor registered");Specify.That(enumerator.Current).Must.Be.InstanceOf(typeof(LoggingCounterInterceptor));varinterceptor=enumerator.CurrentasLoggingCounterInterceptor;service.MethodWithoutBody();service.MethodWithoutBody();service.MethodWithoutBody();Specify.That(interceptor).Must.Not.Be.Null();Specify.That(interceptor.Count).Must.Equal(3,"There should be 3 invocations counted.");Specify.That(interceptor.ErrorCount).Must.Equal(0,"There should be no errors counted.");} [Specification("Should have the correct count of invocations and the correct error count.")]publicvoidShould_Have_Correct_Invocation_And_Error_Count(){varservice=_kernel.Get<IInterceptedServiceMock>();varcontext=newStandardContext(_kernel,typeof(IInterceptedServiceMock));varrequest=newStandardRequest(context,service,typeof(InterceptedServiceMock).GetMethod("MethodWithoutBody"),newobject[0]);varerrorRequest=newStandardRequest(context,service,typeof(InterceptedServiceMock).GetMethod("MethodThatThrowsAnException"),newobject[0]);varinterceptors=_kernel.GetComponent<IInterceptorRegistry>().GetInterceptors(request);varerrorInterceptors=_kernel.GetComponent<IInterceptorRegistry>().GetInterceptors(errorRequest);varenumerator=interceptors.GetEnumerator();enumerator.MoveNext();varerrorEnumerator=errorInterceptors.GetEnumerator();errorEnumerator.MoveNext();Specify.That(interceptors.Count).Must.Equal(1,"There should be 1 interceptor registered");Specify.That(enumerator.Current).Must.Be.InstanceOf(typeof(LoggingCounterInterceptor));Specify.That(errorInterceptors.Count).Must.Equal(1,"There should be 1 error interceptor registered");Specify.That(errorEnumerator.Current).Must.Be.InstanceOf(typeof(LoggingCounterInterceptor));varinterceptor=enumerator.CurrentasLoggingCounterInterceptor;varerrorInterceptor=errorEnumerator.CurrentasLoggingCounterInterceptor;service.MethodWithoutBody();service.MethodWithoutBody();service.MethodWithoutBody();try{service.MethodThatThrowsAnException();}catch{}Specify.That(interceptor).Must.Not.Be.Null();Specify.That(interceptor.Count).Must.Equal(3,"There should be 3 invocations counted.");Specify.That(errorInterceptor.Count).Must.Equal(1,"There should be 1 invocation counted.");Specify.That(errorInterceptor.ErrorCount).Must.Equal(1,"There should be 1 error counted.");}}
Testing this got a little messy I have to admit that. Now for a concrete example of how that looks in my application:
And that’s how I implemented logging for my application :) Needless to say it was the testing that took me the longest to write. And from now on I don’t have to worry anymore about forgetting that logger call. I always have minimal logging going. AOP is usefull in a lot more cases but this seemed like a good and easy example.
Our next post will deal with initializing the modules in your application and their respective behaviors.
I have a new project I started and I could reevaluate my toolset :) I decided to take a closer look at Ninject, Moq and NSpecify. Moq has been talked about enough I think, a really nice way of mocking and I will definitely be using more of it. My original plan was to write one big blog post.. but it is going to be far too long, so I’m breaking it up in smaller bite size pieces.
What I did was download the code, have it rest on my pc for about a week, updated again when I really got round to using it. I read the wiki which gives a short introduction on what’s what in Ninject and everybodies jobs. Decided that the wiki was cool for some more theoretical knowledge but I really needed to see more code.
I opened the project and something rare happened: I was actually very happy with the code I found, not always the case I can tell you ;). Anyway the gold is in the unit tests, it’s got great test coverage and it shows lots of the possibilities of Ninject. It’s like a great big manual for you to get really advanced with it really quickly. I was slightly disappointed to see that there was no NLog support for Ninject, that disappointment quickly turned in to joy when I figured out it only took me 20 minutes to plug NLog in. And it was added to the trunk the same day.
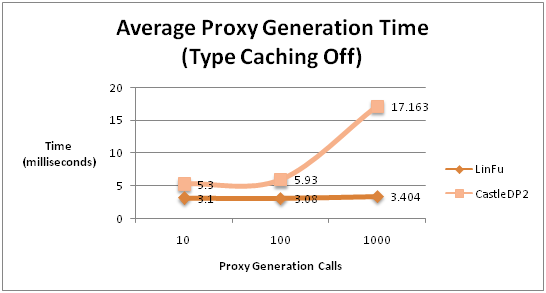
Now I don’t want to make this post about which DI framework is better Windsor, Spring, Structuremap or Ninject. I just know that Ninject and I will become good friends over the next couple of months I like it. Ninject outsources its proxy generation to either Castle’s DynamicProxy2 or to LinFu DynamicProxy. LinFu seemed like an interesting choice after reading this codeproject article. It’s supposedly faster than castle’s dynamic proxy. Luckily Ayende is there to put this in perspective. And I can confirm that the error messages etc castle’s dynamic proxy generates are a lot more useful than LinFu.
Anyway I’m using LinFu at the moment as the proxy generator for Ninject. I will walk you through a sample application I built that will deal with the following subjects of Ninject, Lightspeed and NLog. For Ninject we will use the dependency injection and it’s interceptor possibilities to implement AOP style logging. For Lightspeed we will create our own logger to plug into the context so that we can log what Lightspeed does too. And we want NLog to log through Lightspeed to our database so we’ll be creating a custom target for NLog as well.
But let’s start at the beginning doing DI with Ninject :).
The most important thing to remember: MAKE YOUR METHODS VIRTUAL. Once again make your methods virtual otherwise Ninject has a hard time generating proxies for your classes.
Ninject is different from most other DI Containers in that it doesn’t have XML-configuration, its configuration is done through code (wouldn’t be hard to add an XML configuration for it tho but what’s the point). No XML ?? Suits me fine, everybody that ever worked with me will agree : Ivan no like XML editing. Ninject takes a modular approach by using modules that you pass to a kernel. This is pretty nice that means that an assembly can have a couple of different sets of Modules and all the caller of that assembly needs to do is add the module with the appropriate configuration to their kernel.
Ninject allows you to do a lot of configuration through the use of attributes. But I think I’ll leave it at that for today and continue this tomorrow.
Let’s look at a concrete class from what we’ve seen so far. The class below is the Logger implementation to plug into the LightSpeedContext. We will finish this later on but for now this will be enough to summarize today’s post.
usingNinject.Core;usingNinject.Core.Logging;usingILightSpeedLogger=Mindscape.LightSpeed.Logging.ILogger;usingINinjectLogger=Ninject.Core.Logging.ILogger;namespaceLoggingDemo.UI.Integration{////// This class intercepts logging messages from the LightSpeed context and/// sends them to our NLog logger.///publicclassLightSpeedLogger:ILightSpeedLogger{privatereadonlyINinjectLoggerlogger=NullLogger.Instance;publicLightSpeedLogger(){} [Inject]publicLightSpeedLogger(INinjectLoggerlogger){this.logger=logger;}#region ILogger MemberspublicvirtualvoidLogSql(objectsql){logger.Info(sql.ToString());}publicvirtualvoidLogDebug(objecttext){logger.Debug(text.ToString());}#endregion}}
I just put my first post on http://rubydoes.net
I’m starting a series there on using Silverlight and IronRuby to develop applications. This post is an introduction and announcement of my series on the topic.
I’m porting the IronPython examples from Michael Foord to IronRuby and will do a new example every day of this week.
See you there :)
UPDATE: I didn’t make it clear but this blog will still be active. Just most of my IronRuby stuff will go on rubydoes.net
This week I could start a project that has a database that goes somewhat beyond a blog. This seemed to me like the best way to improve my model generator that I built earlier
And as expected I needed to tweak it a little so that it would work properly, and I added a feature.
Seen as there are 2 files generated for an entity if you add a private field that exists in the database there then the generator will skip it so that you can add more attributes than the ones this script generates for you. If you override a field you also have to put the property in the user file.
I also added support for generating a datacontext. If you want to use the Linq support that Lightspeed is getting then that is a starting point. The same goes for this class with user files and generated file as above, the user file takes precedence.
I hosted this project on google code so you can check it out from there. Or you can download todays version
Scott Guthrie has a series of tutorials on how to consume the Digg API with Silverlight and C#. I wanted to know if I could convert that tutorial to IronRuby.
What I came up has the same end result but due to the fact that IronRuby and its Silverlight implementation isn’t complete yet I can’t mimic the structure of that tutorial yet. I couldn’t yet figure out how to load external xaml files so I put all the xaml in one file.
I have one C# file that resides in the lib folder, this file is called DigStory.cs and contains a DiggStory class which represents a story on digg. It uses XLinq to parse the xml document and return a list of stories.
The above code contains all the code necessary for our application.
We first tell the application to use the app.xaml file. Next we define a method that builds us the request url for the digg api. I chose to use the xml format to stay as close as possible to the sample of Scott.
Like in the C# sample we’re also downloading the file asynchronous. In the callback for when the request completes we parse the returned string into a list of stories and set that as the item source of our Listbox in the app.xaml file.
We handle the selection_changed event of the ListBox to display a detail view on a story with a link to the digg page.
More explanation on the xaml can be found on Scotts blog.
Make sure you get the bits you need from the dynamic silverlight website needed for running dynamic silverlight applications.
Put the path to chiron.exe in your PATH variable and extract the contents of the downloaded sample. open a command prompt and go to the location where you extracted the files to. type chiron /b and click on index.html